...
| Page properties | ||||||
|---|---|---|---|---|---|---|
| ||||||
|
Widget Connector url https://www.youtube.com/watch?v=92t7R-wWMWc&feature=youtu.be
| url | https://www.youtube.com/watch?v=92t7R-wWMWc&feature=youtu.be |
|---|
...
Since students don’t have access to the Course Tools menu, you’ll have to add a link to Collaborate if you want them to be able to join sessions through Scholar. To do so, hover over the plus sign in the top-right corner of your course menu and choose Tool Link.
...

Give the link a descriptive name (e.g. “Collaborate”, “Online Meeting Space”, or something similar) and choose “Blackboard Collaborate Ultra” from the Type menu. So that students can see the link, check Available to Users. When that’s done, click Submit.
...

Your students will be able to see the link and access Collaborate.
...
Once there, you’ll see the following screen.
...

There are two types of Collaborate meeting room available to you: the Course Room and individual sessions.
...
To go into the Course Room, click the round button with three dots next to the Course Room and choose Join Course Room.

That button also allows you to change several settings for the Course Room.

- Copy guest link creates a link that you can give to people that you want to be able to join you for meetings in the Course Room. There is no sign-in needed with the guest link, so off-campus people can join you as well.
- Anonymous dial in gives you the phone number and pin that participants can use if they don’t have access to a computer.
- Edit settings opens a dialog similar to the Session Settings dialog. See the section on Creating a Session for information on that.
- View reports takes you to the session reports, where you can see who attended your sesision and for how long
- Lock course room makes it so students are not able to enter the course room. This will change to Unlock if the course room is locked.
...
If you prefer a bit more control over how a meeting behaves, you can create a session. To do so, click the Create Session button.
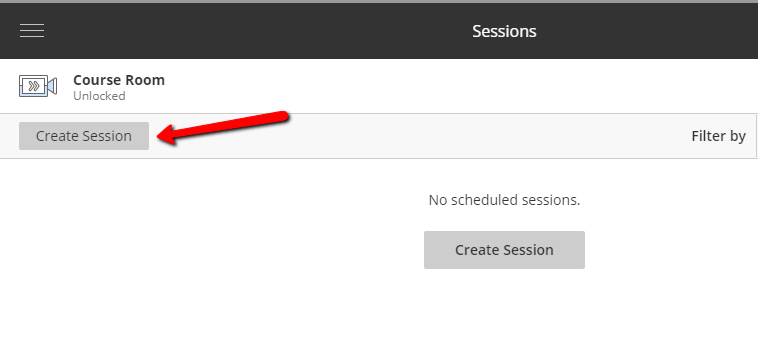
The Create Session sidebar will appear. You’ll need to name the session using the box at the top.

Next, you’ll be asked whether guests are able to join the session, and what their role should be within the session.

If the Guest Access box is checked, anyone with the guest link found below it will be able to join the session. If it’s not, participation in your Collaborate meeting will be limited to only the students that have access through participation in your Scholar shell.
...
Next, you’ll set the date and time of the session using the Event Details area. Make sure to use the calendar and clock buttons to ensure that Scholar reads the correct date and time.

You can also control how early people are allowed to enter the session before it starts. While you may not want to give them too long, it’s important to leave some time for both you and your participants to make sure your audio and video is working.
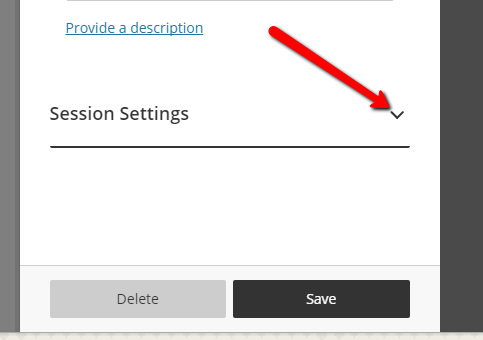
Directly below that, you’ll see the Session Settings area. Click that to bring up additional choices.
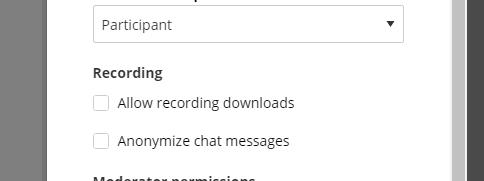
On top, you are able to choose whether students enter with a particpant, presenter or moderator role.

Next, you will have to choose a couple of settings for recordings; whether any recordings are downloadable (if they’re not, participants and others can only view them online. You’re also able to toggle whether the chat messages are tagged with their real author, or whether to remove the names in the recording of the chat.
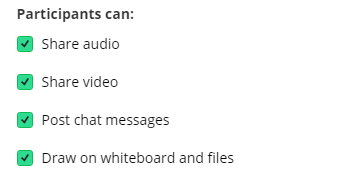
Scroll further, and you can set what people in the Participant role can do within your sessions. If one or more of these boxes is unchecked, people in the Participant role will not be able to do whatever the box represents.
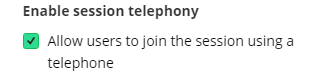
You can also choose whether people can join the session by telephone. Phone attendees function the same as ones that use computer audio.
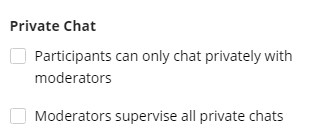
Finally, you can choose whether or not participants can chat privately with each other, and whether you can view the private chats between participants.
When you’re done, click Save and your session will be created.
When it’s time for your session, you can join it by clicking on it. You can also access options by clicking the circle with three dots next to the session.
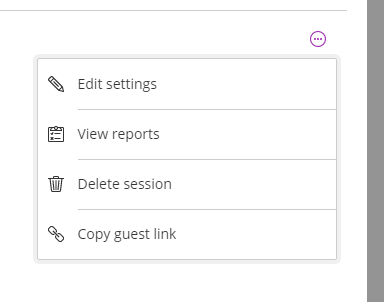
- Edit Settings returns you to the setup sidebar
- View Reports allows you to view reports on session participation
- Delete session removes the session from the menu
- Copy guest link allows you to invite guests to the session.